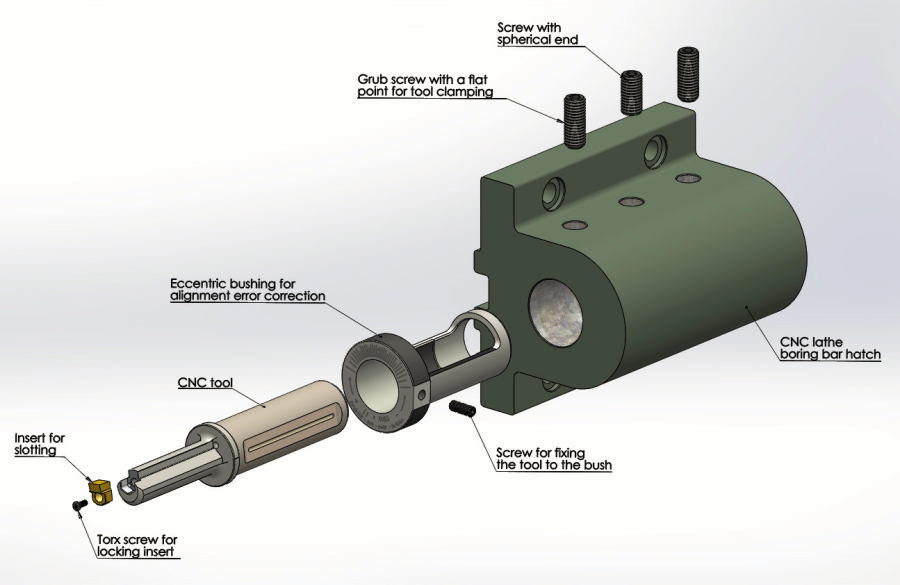
1. Place the insert in the tool housing and clamp in on by tightening the Torx screw with the screwdriver;
2. Place the tool inside the eccentric bushing and align the white notch engraved on the tool collar with 0 on the front of the bushing; then, tighten the clamping screw positioned radially on the bushing collar, to lock the tool to the bushing;
3. Insert the unit composed of bushing and tool inside the lathe’s boring bar hatch, tighten the screw with the spherical end inside the centring groove on the tool’s socket rod, being careful not to completely block the tool, and finally tighten the two flat point grub screws.
SUGGESTION FOR USE ON LATHES
To rotate the REV eccentric bushing easily for alignment corrections, we recommend that the operator oil the bushing when the tool is assembled.
If an alignment error is detected on the processed workpiece and a correction needs to be made by rotating the eccentric bushing, we recommend first of all loosening screws (10) and (11) and then screw (8). When the correction has been made, proceed with tightening the first screw (8) and then screws (10) and (11).
It is advisable, but not essential, to widen (as precisely as possible) one of the threaded holes on the boring bar hatch so as to insert a larger flat point grub screw (10) and therefore guarantee a large supporting surface and, accordingly, perfect tool positioning. In particular, we suggest using a 16 mm screw or larger.
We recommend making sure that all screws have the required surface for clamping the tool perfectly flat and in no way damaged or deformed. Otherwise, immediately replace with new screws.
During assembly, the screw with spherical end (9) must be tightened all the way without forcing and then unscrewed by two revolutions so that the spring remains loaded on the tool. These screws, in fact, do not clamp the tool on but simply hold it in position during eccentric bushing rotation.
