CHECKS AND ADJUSTMENTS
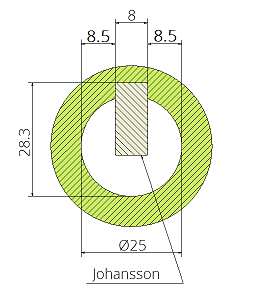
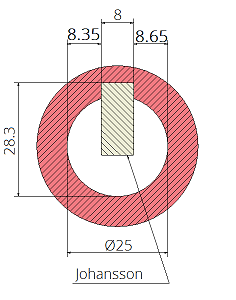
When the first key has been processed, one of the ways to check the alignment is to fit a Joahnsson block, without any room for movement, in the processed housing and, use a gauge to take the measurement between the end of the diameter and the wall of the Joahnsson block.
 Figure 1 Figure 1 |
 Figure 2 Figure 2 |
In the example provided in Fig. 1 the measured value, 8.50 mm, is correct, while in Fig.2 the measured value is 8.35 mm on one side and 8.65 on the other, resulting in an alignment error of 0.15 mm that needs to be corrected.
CORRECTING ALIGNMENT ERRORS WITH THE REV BUSHING
If there is an alignment error that needs to be corrected, perform the following operations:
1. Start by loosening the flat point grub screws that hold the tool in the boring bar hatch and the grub screw positioned radially in the collar of the eccentric bushing, turn the eccentric bushing in the opposite direction of the error; it basically acts as a y axis, moving the tool in Y+ and Y-; each notch engraved on the bushing is equal to 0.03 mm;
2. Tighten the clamping grub screw positioned radially on the bushing collar back up, followed by all of the other screws on the boring bar hatch. We advise you to always observe the recommended parameters and suggestions. In the example provided here on the side, to would have been necessary to rotate the eccentric bushing by five notches to correct the alignment.
